Difference between revisions of "Tagboard"
From RCampus Wiki
| Line 29: | Line 29: | ||
==Select who can post== | ==Select who can post== | ||
| − | |||
# See "Managing QuickPost" above. | # See "Managing QuickPost" above. | ||
# Select one of these options: '''Only Me''', '''Users''' or '''Public'''. | # Select one of these options: '''Only Me''', '''Users''' or '''Public'''. | ||
# Press ''save''. | # Press ''save''. | ||
| − | |||
==Edit QuickPost title, post button or description== | ==Edit QuickPost title, post button or description== | ||
Revision as of 18:17, 31 August 2009
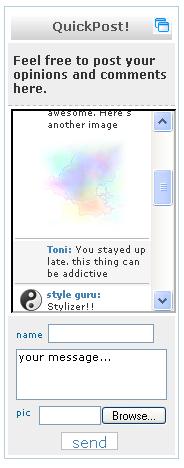
Our QuickPost tagboard is an online board for short postings. QuickPost tagboards are available for all personal and group websites and ePortfolios.
Contents
QuickPost features
- Show a personal icon and/or avatar with posts.
- Attach an image to posts.
- Flextible settings:
- Personal setting allows only you to post and nobody else.
- Users-only setting allows only members of a website to post by logging in first.
- Public setting allows everyone to post without logging in.
- Personalize QuickPost titles and buttons.
- Description area.
- Customize QuickPost size by height and width.
- Scrollable list of posts.
- and more.
Managing QuickPost
- For personal websites, ePortfolios and club websites: Please follow these steps then see below.
- Click on manage site (
 ) button from the admin menus located at the top of the page.
 - Select Setup QuickPost menu under the Design (
 ) box.
- For class websites, study groups and tutor rooms: Please follow these steps then see below.
- Go to the home page.
- Select Quickpost Settings from the side menus.
Select who can post
- See "Managing QuickPost" above.
- Select one of these options: Only Me, Users or Public.
- Press save.
Edit QuickPost title, post button or description
- See "Managing QuickPost" above.
- Enter a title name, post button name and the description of your QuickPost.
- Press save.
Customize QuickPost size
- See "Managing QuickPost" above.
- Set height and width. Default size is set to 400 x 120.
- Select message order by clicking either Oldest first or Newest first.
- Check yes or no next to Scrollable message list.
- Check yes or no next to Allow image upload.
- Select a number of posts to display.
- Press save.
Disable a QuickPost
- Click on the “QuickPost settings” at the bottom of the QuickPost.
- Click on Disable this QuickPost.
- Press save.
