Document center
From RCampus Wiki
(Redirected from Documents)
The Document Center helps you manage your documents and access them from anywhere.
Contents
How to access my documents
- Click on the file cabinet icon on the top-right of the screen
- From the pop up menu, select my documents
Features
Using the document center you can:
- Upload documents
- Keep your documents permanently in one place
- Organize your documents by copying and moving into folders
- Create text or HTML documents online
- Create documents linked to other documents on the web
- Access your documents from any computer with web access
- Share your documents with classes, teams, students, groups, etc.
- Send documents via the message center to classes, teams, groups, etc.
Create a document
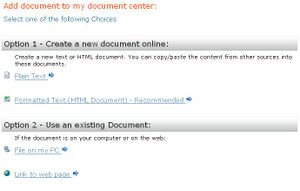
There are four types of documents. Select the one that matches your need:
Plain text document:
This option allows you to create a plain text document.
- Click on the documents (
 ) icon on top of the page.
 - Click on the new document submenu.
- Select Plain Text (
 ) under the Option 1.
 - Enter a title.
- Enter the content to be saved. You can also copy and paste plain text from another program.
- Press [save].
HTML document:
This option allows you to create a formatted text document using the online editor.
- Click on the documents (
 ) icon on top of the page.
 - Click on the new document submenu.
- Select Formatted Text (HTML Document (
 ) under the Option 1.
 - Enter a title.
- Enter the content to be saved. You can also copy and paste formatted text from Microsoft Word.
- Press [save].
Upload a document:
This option allows you to upload a file from your PC.
- Click on the documents (
 ) icon on top of the page.
 - Click on the new document submenu.
- Select File on my PC (
 ) under the Option 2.
 - Enter a title.
- Click on Browse, select the file to be uploaded and press [open].
- Press [save].
Link to web page:
This option allows you to link to an external web page.
- Click on the documents (
 ) icon on top of the page.
 - Click on the new document submenu.
- Select Link to web page (
 ) under the Option 2.
 - Enter a title.
- Enter the URL of the web page.
- Press [save].
Delete a document
Delete my files
- Go to documents by clicking on the file cabinet icon on top of the page.
- Click on the document to be deleted.
- Select delete from the popup menu.
Delete images
- Go to documents by clicking on the file cabinet icon on top of the page.
- Look for the images you wish to delete under Area 2: Online Editor Uploads.
- Select delete from the popup menu.
Delete old student submissions
- Go to documents by clicking on the file cabinet icon on top of the page.
- Click on the coursework title under Area 3: My Student Submissions.
- Check the box next to the submitted files you wish to delete.
- Press Delete selected files.
NOTE: To delete files submitted for old, inactive classes, you must first "activate" your old, inactive classes. Then follow the steps above.
Reactivate a Document
- Click on the documents (
 ) icon on top of the page.
 - Click “show inactive” to display the inactivated folders.
- Click on the menu next to the folder and select “edit”.
- Untick the box for “Disable” and press [save].
Storage limit
Please see storage limit for more information.
