Difference between revisions of "Self registration"
m (→See also) |
|||
| (13 intermediate revisions by 3 users not shown) | |||
| Line 1: | Line 1: | ||
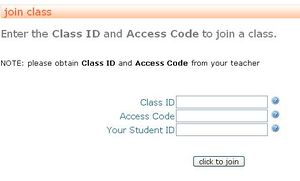
| − | [[Image:JoinClass.JPG|thumb| | + | [[Image:JoinClass.JPG|thumb|300px|Class join screen. This page is used by students to self-register. Teachers should let students know about Class ID and Access Code prior to this step.]] |
| − | '''Self-registration''' is when students join a class on their own. This is the preferred method of building a class [[roster]]. See [[manual registration]] for a less-efficient method of building a roster. | + | '''Self-registration''' is when students join a class on their own. This is the preferred method of building a class [[roster]]. |
| + | |||
| + | See [[manual registration]] for a less-efficient method of building a roster. | ||
| + | |||
==How it works== | ==How it works== | ||
| − | # | + | # [[Invite]] students (see below). |
# Students follow the instructions to join the class. | # Students follow the instructions to join the class. | ||
# As students join the class, the [[roster]] is built. | # As students join the class, the [[roster]] is built. | ||
| − | |||
| − | |||
| − | |||
| − | |||
| − | ==Benefits of self-registration | + | {{send invite}} |
| + | |||
| + | |||
| + | Note 1: Students who joined the class late will have access to class materials and communications from day one. | ||
| + | |||
| + | Note 2: Teachers can set the deadline for students to join the class. | ||
| + | |||
| + | |||
| + | ==Steps for students== | ||
| + | Please see [[joining a class]] for students to join a class. | ||
| + | |||
| + | |||
| + | ==Benefits of self-registration== | ||
* Roster is built automatically (no manual entry is required by teachers). | * Roster is built automatically (no manual entry is required by teachers). | ||
* Student profiles are created and maintained by students and not by faculty members. This allows students to control their email address and email notification settings. | * Student profiles are created and maintained by students and not by faculty members. This allows students to control their email address and email notification settings. | ||
* Students can access [[coursework]] materials, [[gradebook|grades]], [[message board]], etc. | * Students can access [[coursework]] materials, [[gradebook|grades]], [[message board]], etc. | ||
| + | |||
| + | |||
| + | ==Self-registration FAQ== | ||
| + | ===My student registered in a wrong class. Can I transfer him to another class?=== | ||
| + | Yes, you can drop the student from the incorrect class and add them to the correct class by following the steps for [[Manage roster#Adding students to multiple classes|transferring students]]. | ||
| + | |||
| + | |||
| + | ===If I drop a student from my class, will it remove him from RCampus?=== | ||
| + | No, it will not remove him from RCampus. | ||
| + | |||
==See also== | ==See also== | ||
| Line 23: | Line 44: | ||
| − | [[Category: | + | [[Category:LMS]] |
Latest revision as of 18:43, 3 February 2023
Self-registration is when students join a class on their own. This is the preferred method of building a class roster.
See manual registration for a less-efficient method of building a roster.
Contents
How it works
- Invite students (see below).
- Students follow the instructions to join the class.
- As students join the class, the roster is built.
How to invite
Decide if you want to invite others by providing written instructions, sending a link to their email or by inviting them directly (user will be prompted to accept the invitation when logging in to the system).
Provide written instructions
- Select invite others.
- Provide written instructions.
Send link to email
- Select invite others.
- Click invite online.
- Select email address.
- Enter email addresses into box.
- Click send invites.
Add instantly
- Select invite others.
- Click invite online.
- Click the username radio button.
- Enter usernames into the text area.
- Click add instantly or send invites.
To view the status of invites
- Click invite others.
- Select see all invitations.
- You can view all pending, accepted, denied and deleted invites sent via email.
To delete an invite
- Click invite others
- Select see all invitations
- Click Delete under the invited person's username or email address
Note 1: Students who joined the class late will have access to class materials and communications from day one.
Note 2: Teachers can set the deadline for students to join the class.
Steps for students
Please see joining a class for students to join a class.
Benefits of self-registration
- Roster is built automatically (no manual entry is required by teachers).
- Student profiles are created and maintained by students and not by faculty members. This allows students to control their email address and email notification settings.
- Students can access coursework materials, grades, message board, etc.
Self-registration FAQ
My student registered in a wrong class. Can I transfer him to another class?
Yes, you can drop the student from the incorrect class and add them to the correct class by following the steps for transferring students.
If I drop a student from my class, will it remove him from RCampus?
No, it will not remove him from RCampus.
